 To start, you will need...
An image to color
Color Pencils from light to dark
Blender Stump
Odorless Mineral Spirits
Now, for the pencil colors, when coloring an image, you want to give it depth. To do this, you need several shades of the color. I usually go with three. A light, a medium, and a dark. In this case, I went with Yellow Orche, Goldenrod, and Burnt Orche. Some times I only go with two, depends on what I am coloring.
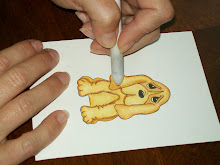
 To begin, use the lightest color first. In this case, it is Yellow Ochre. Add a slightly thick line of Yellow Ochre to the outer edges of the image.
 This is what it look like once you have added Yellow Ochre to the outer edges of the image.
 With a blender stump dipped in Odorless Mineral Spirits, blend the color in small circles around the outer edges of the images, pulling the color into the center giving the image complete color coverage.
This is what it looks like once it is all blended.
 Now, to add some depth to the image. Color a thinner line of Goldenrod to the all of the edges.
 This is what it look like once you have added Goldenrod to the outer edges.
 Like the first time around, blend the color in in small circles around the edges and pull the color into the center. Don't pull the color all the way the the center like the first time. Just blend it in part of the way, making it look smooth. You want the lighter color to stay showing in the center.
This is what it looks like once it is all blended.
 Now you want more depth to the outer parts of the image. Take Burnt Ochre and add a thin line of color to the outer parts of the dog minus the nose and the belly.
 This is what it looks like when you are finished adding Burnt Ochre to the edges.
 Blend the edges with a blender stump. Instead of blending in circles like with the first two blendings, blend it by going back and forth, lightly pulling to the center. This way it keeps the darker color to the outer edges of the image giving it depth.
This is what it looks like once it is blended.
 I needed to add just a little more depth to my image. I added a touch of Goldenrod to the edges of the nose,the bridge of the nose, and the base of the belly. I added a touch of Burnt Ochre under the nose at the neck line, and the the back legs. I then blended the colors in for the final time to complete the image.
 This is what is looks like when you are done.
This is the finished creation. I took the image, cut it out with a Nestibilities, destressed it, and layered it up on the card you see. I hope this tutorial helps y'all understand how I color all the images with Prismacolor Pencils and Odorless Mineral Spirits. This is one heck of a task creating a tutorial, but I finally got it done for y'all.
Tell me....
What do y'all think?
I would love to see what y'all come up with, so please send me a link to show what you have done!!
I forgot to mention, my image is a digital image from Doodle Palace. Check out their store on my sidebar. They have incredibily cute stuff!!


Fanatastic tutorial! Thanks for all your hard work in putting it together...you too Aliyah!
ReplyDeleteBlessings,
Mary
Just wonderful! Love the step by step instructions as well as photos all the way along! Thanks so much for the time and effort to put this together for us, you did a great job! =)
ReplyDeleteDee
your work is always so appreciated but this tutorial really rocks. Sorry you had such a tough time, but it really helped clear up some questions so thank you very much!!
ReplyDeleteFAB tute...you make it look soooo easy :0)
ReplyDeleteThanks for the great instruction. I really liked the step by step photos to show how each layer is added.
ReplyDeleteWow!! Great job Michelle!! Thank you so much for taking the time and effort to make the tutorial. That really gave me some great insight and understanding into how to be coloring these images.
ReplyDeleteYour work is always so inspiring - thank you for sharing your secrets!
Brilliant Michelle, thank you for sharing your tutorial, I need more colours! I'd love to put a link on my side bar, if that's ok with you!
ReplyDelete((Lyn))
Hey Lyn, I have no problem with that. I think it is great. I still would like to see everyone's creations from what y'all have learned from my tutorial!! It is neat to see that so many people wanted to know how I color. It is something I have done all my life. Never thought I'd do a tutorial on it!!
ReplyDeleteEveryone have a great day!!
Michelle
Great tutorial! I forwarded your link to a gal that was looking for some info!!
ReplyDeleteThank you so much for sharing your wonderful tutorial, Michelle!
ReplyDeleteWow - this is an amazing tutorial. I can't wait to try it!!! I'm sure my coloring will be so much better thanks to you.
ReplyDeleteBlessings,
Christine
Hi Michelle, found your blog from Dustin's.
ReplyDeleteLove this tutorial! I would never have thought to use three different shades. :)
I have a couple of questions and hope you can answer: 1. When you add the 2nd and 3rd colors, do you add the outlines at the EDGE of the image? Or the edge of the previous color(s)? Does my question make sense? LOL and 2. Do you wait for the previous color(s) to dry before adding additional colors?
Thanks again!
Ted
Hey there Ted, I was gonna try to email you, but I guess your blog is not public. In anwer to your questions, you add the 2nd and the 3rd (if you use a 3rd) to the edges just like the 1st and no you do not need to wait for it to dry to continue. It actually works better if you don't wait. Hope this helps.
ReplyDeleteHave a great day!!
Michelle
Thanks so much, Michelle! I thought my blog WAS public! LOL! I'm off to fix that. Thanks for pointing it out and thank you for the follow-up answers!
ReplyDeleteGreat tutorial Michelle. I would love to know what brand stump you used.
ReplyDeleteThis is fab thanks so much for your time in putting this up for fellow crafters much appreciated
ReplyDeleteThanks again hugs judex
Hi! I just found your blog from Dustin Pike's website. You have beautiful cards. I found this coloring technique interesting. I see all these cards colored with Copic markers, but who can afford them? I have a few questions, if you don't mind: 1) Do you use watercolor pencils?, 2) any special paper, and 3) is a blender stump the same thing as one of those chalk smearing thingies? Thanks for the fabulous tut!
ReplyDeleteFantastic tutorial, I am new to coloring the digi stamps and just purchased (waiting to get them) a set of the prismacolor pencils to see if I like using them. Thanks again for the tutorial, I guess I will eventually need to get the blending stump and olorless mineral sprits, but need to get used to the pencils and coloring once again...
ReplyDeleteI hope you're feeling better from your migraine, Michelle. Those can be buggers. I found your site through Dustin's. You have an amazing gift and thank you for sharing it with us not so gifted crafters out here... ;) I did want to re-ask Paula's question though about the watercolor pencils. Do you use those or just the regular Prismacolor pencils? I love my watercolor pencils, but I just don't get the rich colors that you do, but then again... I use them with water. ;)
ReplyDeleteThanks again!
GORGEOUS! ;) awesome tut too! ;)
ReplyDeleteWhat a terrific job. Thanks so much for hanging in there for us. This is exactly the information I have been looking for. Thank you.
ReplyDeleteElaine
A great tutorial Michelle! Where did you get the stamp? I love it!
ReplyDeleteWhere can I find the mineral spirits?
ReplyDeleteThanks for sharing this fabulous tutorial. I have had colored pencils around forever and just couldn't get the effect I was looking for. I went the Copic route ($$$), ouch. And here I had Odorless Mineral Spirits for eons and never would have thought to use it. I just found you by accident, lucky me. :) I can't wait to get out my pencils. :)
ReplyDeleteThanks for this great tutorial! I have been doing the blending with the spirits, but the 3 colours & the way you do it is so much better. Can't wait to colour something. I've bookmarked this page and will come back many times I'm sure. And great photo's by your DD - worth all the effort.
ReplyDeleteI have mostly coloured with watercolour pencils on stamped images, but with digi's that doesn't work so well.
Thanks again!!
Thank you so much for making this tutorial!!! I just started using colored pencils and I am experimenting trying to get my pictures to look good. Now I will practice your technique.
ReplyDeleteChris.Pickul@hotmail.com
http://pickulblog.blogspot.com/
That is great. I wish my digi pictures looked like that dog. You have such fantastic stuff in america and other places around the world. I have never heard of a blender stump?? How do i get one. Bloody Fantastic technique.
ReplyDeleteFrom Christine R. Australia